Building a Simple Docker-like Container Runtime in Python
I’ve always been fascinated by how Docker works behind the scenes. Containers have revolutionized the way we develop and deploy applications, but the magic often feels like a black box. To demystify it, I decided to embark on a learning journey to build a simple Docker-like container runtime using Python.
Disclaimer: This project is purely for educational purposes. I’m not entirely sure if this is exactly how Docker operates internally, but my main goal was to pull and run a Docker image while learning about key technologies behind containerization.
You can find the complete code for this project on GitHub.
This application allows you to:
- Pull Docker images from Docker Hub.
- Run containers with isolated namespaces, limited resources, and custom networking.
The Motivation Behind the Project
The primary goal was to create a minimal container runtime that can:
- Pull Docker images from Docker Hub.
- Run containers using Linux features like namespaces, cgroups, and custom networking.
This hands-on approach gave me a deeper understanding of how containers work without relying on abstractions provided by tools like Docker.
Understanding the Building Blocks
Before diving into the implementation, it’s essential to understand the key components that make containerization possible in Linux.
cgroups (Control Groups)
cgroups are a Linux kernel feature that allows you to:
- Limit Resources: Restrict CPU, memory, or I/O usage for a group of processes.
- Monitor Usage: Keep track of resource consumption.
- Isolate Processes: Prevent one group from interfering with another.
In my project, I used cgroups to limit the CPU usage of containerized processes.
iptables
iptables is a powerful utility for configuring the Linux kernel’s packet filtering and NAT rules. It is essential for:
- Network Address Translation (NAT): Allowing containers to access the internet through the host machine’s network interface.
- Traffic Control: Defining rules for traffic flow to and from containers.
In the project, I used iptables to set up NAT so that containers could communicate with external networks.
The /proc Filesystem
The /proc filesystem is a pseudo-filesystem that provides a view into kernel data structures. Applications and utilities like ps and top rely on /proc for system information.
Mounting /proc inside the container is crucial, as many processes use it to query their runtime environment.
Building the Container Runtime
Pulling a Docker Image
The first step was to implement the ability to pull Docker images. Here’s the basic flow:
- Authentication: Request an authentication token from Docker Hub for the desired image.
- Fetching the Manifest: Retrieve the image manifest, which contains the list of layers.
- Downloading Layers: Download each layer as a compressed file.
- Extracting Layers: Extract the layers to create the container’s root filesystem.
Running the Container
The next challenge was to run the container in an isolated environment. Here’s the workflow:
- Namespace Isolation: Use
unshareto create new namespaces for UTS, mount, PID, and network isolation. - Filesystem Setup: Change the root directory to the container’s root filesystem using
chroot. - Mounting
/proc: Mount the/procfilesystem inside the container for process information. - Resource Limitation: Use cgroups to limit CPU usage for the container.
- Networking Setup: Create a virtual ethernet pair (
veth) to provide network connectivity to the container. - Starting a Shell: Launch a shell (
/bin/sh) inside the container.
Exiting and Cleaning Up
When the container exits, the application cleans up by:
- Unmounting
/proc. - Removing cgroups.
- Deleting network interfaces.
- Reverting iptables rules.
Step-by-Step Usage
Prerequisites
- Python 3.x
- Root privileges (required for the
runcommand) - Linux system with support for namespaces, cgroups, and networking features
- Python Libraries:
requests - System Utilities:
ip,nsenter,iptables,mount,chroot
Pulling an Image
To pull a Docker image:
python3 main.py pull library/ubuntu:latest
This command authenticates with Docker Hub, downloads the image layers, and prepares the container’s root filesystem at .images/library/ubuntu/latest.
Running a Container
To run the container:
sudo python3 main.py run library/ubuntu:latest
Note: Root privileges are required to perform operations like creating namespaces, configuring cgroups, and setting up networking.
Exiting the Container
Type exit or press Ctrl+D to leave the container shell. The application will automatically clean up all resources.
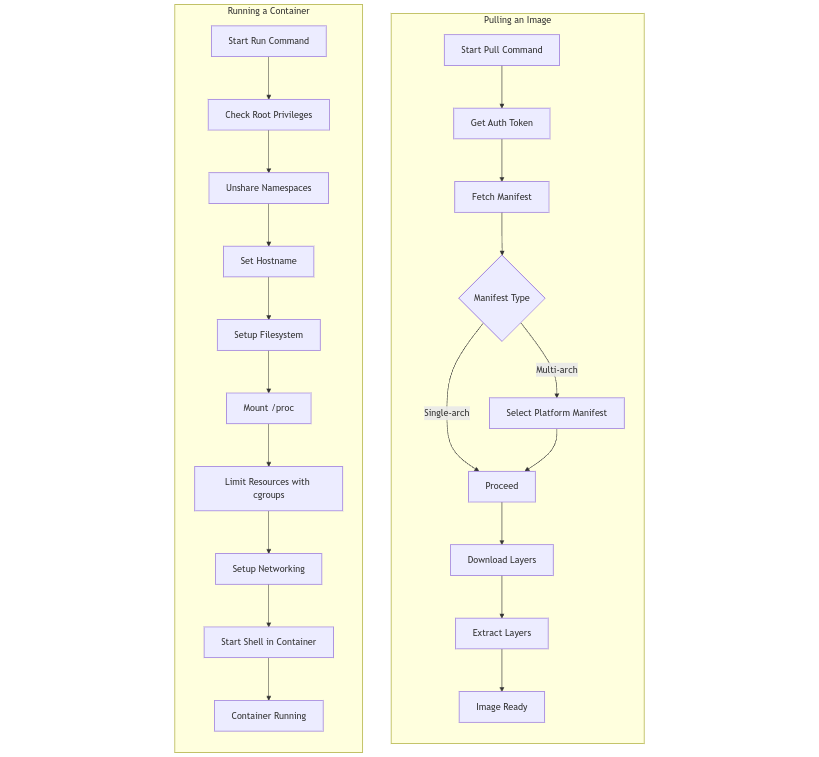
Visualizing the Workflow
Here’s a simple diagram of the workflow for pulling and running a container:
Lessons Learned
- Namespaces and Isolation: Creating namespaces using
unsharetaught me how processes can be isolated effectively without the overhead of virtual machines. - Resource Management with cgroups: Using cgroups to limit resources gave me insight into how containers ensure fair resource sharing.
- Networking with iptables: Setting up NAT manually using iptables was a challenge but helped me appreciate the abstraction Docker provides.
- The Importance of
/proc: Mounting/procwas necessary for compatibility with many utilities and processes.
See the Code
The complete implementation is available on GitHub. Feel free to explore, experiment, and suggest improvements!
Conclusion
This project was a rewarding experience that deepened my understanding of containerization technologies. While it’s far from replicating Docker’s full functionality, building this simple runtime helped me appreciate the power of Linux features like namespaces, cgroups, and iptables.
If you’re curious about how containers work, I highly recommend trying a similar project. There’s no better way to learn than by diving into the details.
Let’s continue exploring and learning! 🚀