Building a Scalable TODO App on AWS: CI/CD Pipelines, Serverless vs. Serverful Architectures, and Infrastructure-as-Code
1. Introduction
Cloud computing is a big deal these days, and the best way to learn it is by getting your hands dirty with real projects. That’s why I decided to build a TODO app using AWS. This wasn’t just about making a simple app to manage tasks—it was about learning AWS inside out, mastering CI/CD pipelines, and getting ready for the AWS Developer Certification Exam. Along the way, I also wanted to explore how to build scalable and secure systems, and get comfortable with deploying and managing cloud applications.
Why This Project?
-
Hands-On Practice with AWS
Reading and watching tutorials is helpful, but building something real teaches you so much more. This project let me work with a bunch of AWS services like Lambda, API Gateway, DynamoDB, Cognito, S3, CloudFront, EC2, VPC, CodePipeline, CodeBuild, and CloudFormation. By putting these services together, I got a better understanding of how they work in real life. -
Learning CI/CD by Doing
CI/CD (Continuous Integration and Continuous Deployment) is a must-have in modern software development. This project helped me set up a fully automated CI/CD pipeline using AWS CodePipeline and CodeBuild. I learned how to automate building, testing, and deploying code, so every change I made could go live without a hitch. -
Getting Ready for the AWS Developer Exam
I’m preparing for the AWS Developer Certification Exam, and this project was a great way to practice what I was studying. From IAM roles to serverless architecture and CloudFormation, this project covered a lot of the topics I needed to know for the exam. -
Comparing Serverless and Serverful Architectures
One of the coolest parts of this project was building the TODO app in two ways: serverless and serverful. This lets me see the pros and cons of each approach and understand when to use which. -
Learning Infrastructure-as-Code with CloudFormation
Managing cloud resources manually can be messy and time-consuming. With AWS CloudFormation, I learned how to define my infrastructure as code, making it easier to manage, replicate, and version-control.
2. Overview of the TODO App
The TODO app I built is a simple task management tool that lets users create, read, update, and delete tasks. Here’s a breakdown of how the app works and the technologies behind it:
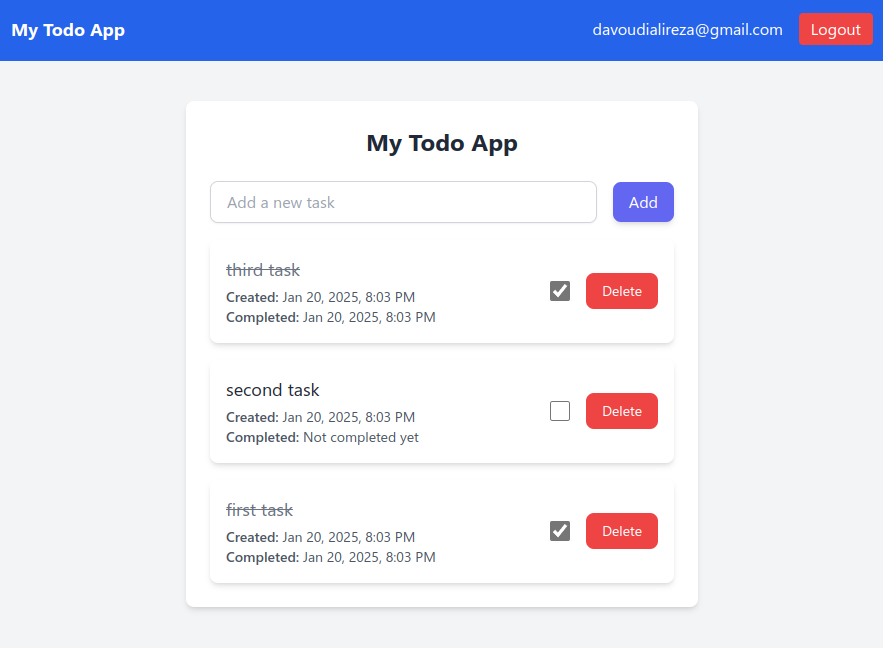
Frontend: React + Vite
The frontend of the app is built using React, a popular JavaScript library for building user interfaces, and Vite, a fast and modern build tool. This combination ensures a smooth and responsive user experience. The app’s interface is clean and intuitive, allowing users to easily manage their tasks. Key features of the frontend include:
- User Authentication: Users log in using AWS Cognito, which handles user registration, login, and session management securely.
- Task Management: Once logged in, users can:
- Create new tasks.
- Read their list of tasks.
- Update existing tasks.
- Delete tasks they no longer need.
- Styling: The app uses Tailwind CSS for styling, making it visually appealing and easy to customize.
Backend: Python + FastAPI
The backend is powered by Python and FastAPI, a modern web framework for building APIs. FastAPI is known for its speed and simplicity, making it a great choice for this project. The backend handles all the logic for managing tasks and interacts with DynamoDB, a NoSQL database provided by AWS, to store and retrieve task data. Key features of the backend include:
- RESTful API: The backend exposes a RESTful API that the frontend uses to perform CRUD (Create, Read, Update, Delete) operations on tasks.
- Authentication Integration: The backend integrates with AWS Cognito to ensure that only authenticated users can access their tasks.
- Database Operations: All tasks are stored in a DynamoDB table, which provides fast and scalable data storage.
3. Project Structure
The project is hosted on GitHub and is available in the repository: https://github.com/adavoudi/todo-app-aws. Here’s a breakdown of the project structure and the role of each file:
backend/
This folder contains the backend code for the TODO app, built using Python and FastAPI.-
buildspec-backend.yml
This is the CodeBuild build specification for the backend. It defines the steps to build the Docker image for the backend application and push it to Amazon Elastic Container Registry (ECR). This file is used in the CI/CD pipeline to automate the backend build process. -
buildspec-frontend.yml
This is the CodeBuild build specification for the frontend. It defines the steps to build the React app (using Vite) and upload the built files (from thedist/folder) to an S3 bucket. These files are then served via CloudFront. -
cloudformation-application.yml
This CloudFormation template defines the infrastructure for the TODO app, including resources like S3, CloudFront, Cognito, DynamoDB, Lambda, API Gateway, and more. It also supports both serverless and serverful architectures, depending on the configuration. -
cloudformation-cicd.yml
This CloudFormation template sets up the CI/CD pipeline using AWS CodePipeline and CodeBuild. It defines resources like the artifact bucket, ECR repository, CodeBuild projects, and the pipeline stages for building and deploying the app. -
docker-compose.yml
This file is used for local testing during development. It sets up a LocalStack container, which mimics AWS services locally. -
Dockerfile
This file is used to create a Docker image for the backend application. It uses the AWS Lambda Web Adapter, which allows the backend to run on AWS Lambda, EC2, Fargate, or even locally.The AWS Lambda Web Adapter (from awslabs/aws-lambda-web-adapter) allows developers to run web applications built with familiar frameworks (like FastAPI, Flask, Express.js, etc.) on AWS Lambda. It translates HTTP requests into a format that Lambda can understand, making it easy to deploy web apps on Lambda without rewriting the code. The same Docker image can also run on EC2, Fargate, or locally, providing flexibility across different environments.
-
frontend/
This folder contains the frontend code for the TODO app, built using React and Vite. requirements.txt
This file lists the Python dependencies required for the backend application.
4. The CI/CD Pipeline
For this TODO app, I used AWS CodePipeline and CodeBuild to automate the build, and deployment processes. Here’s how the pipeline works and how you can set it up:
Step 1: Create a GitHub Connection Using AWS CodeStar
Before setting up the pipeline, you need to create a connection between your GitHub repository and AWS. This is done using AWS CodeStar Connections. Here’s how to do it:
- Go to the AWS CodeStar Connections Console.
- Create a new connection to GitHub.
- During the setup, make sure to install the AWS Connector for GitHub app. This allows GitHub to send signals to AWS whenever an event (like a push to the
mainbranch) occurs in your repository. - Once the connection is created, you’ll receive a Connection ARN. This ARN is used in the CloudFormation template to link your GitHub repository to the pipeline.
Step 2: Deploy the CI/CD Pipeline Using CloudFormation
With the GitHub connection in place, the next step is to deploy the CI/CD pipeline using the cloudformation-cicd.yml template. This template defines the entire pipeline infrastructure, including:
- An S3 bucket for storing build artifacts.
- An ECR repository for Docker images.
- Two CodeBuild projects for building the backend and frontend.
- A CodePipeline with four stages to automate the build and deployment process.
Here’s how to deploy the pipeline:
- Go to the AWS CloudFormation Console.
- Create a new stack using the
cloudformation-cicd.ymltemplate. - Provide the following parameters:
GithubConnectionArn: The ARN of the GitHub connection you created earlier.ProjectName: The name of the project (default istodos).GithubUserName: Your GitHub username.GitHubRepoName: The name of your GitHub repository (e.g.,todo-app-aws).IsServerless: Whether the application should use a serverless architecture (trueorfalse). In the next sections, we’ll dive deeper into the differences between serverless and serverful architectures and how they’re implemented in this project.
Once the stack is created, the CI/CD pipeline will be set up and ready to use.
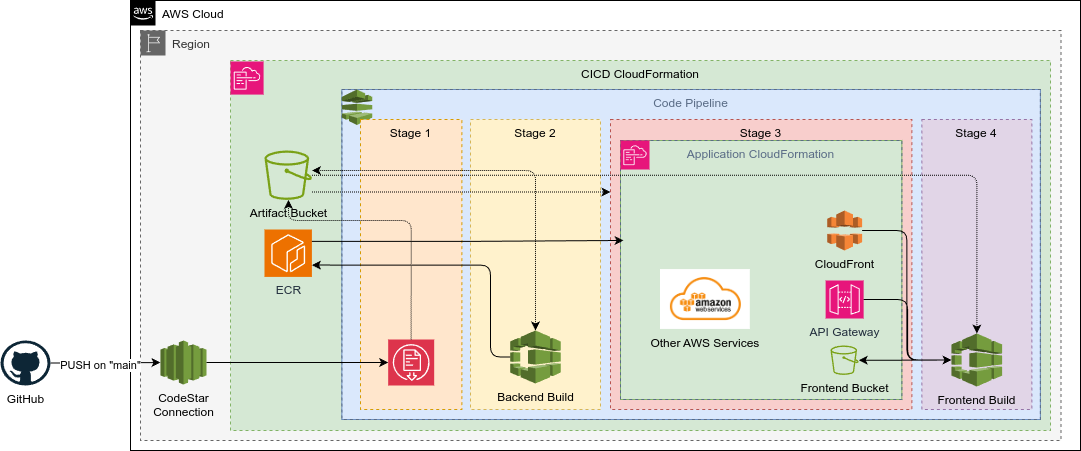
The CI/CD Pipeline Stages
The pipeline consists of four stages, each handling a specific part of the build and deployment process. Here’s a detailed breakdown:
Stage 1: Source
- Purpose: Pull the latest code from the GitHub repository.
- How It Works:
- The pipeline monitors the
mainbranch of your GitHub repository. - When a change is pushed to the
mainbranch, the pipeline automatically triggers. - The latest code is pulled from GitHub and stored in the S3 artifact bucket for use in subsequent stages.
- The pipeline monitors the
Stage 2: Backend Build
- Purpose: Build the Docker image for the backend and push it to Amazon ECR.
- How It Works:
- The CodeBuild project for the backend uses the
buildspec-backend.ymlfile to:- Build the Docker image for the FastAPI backend.
- Push the image to the ECR repository.
- The Docker image is tagged with a unique identifier (the commit hash) to ensure versioning.
- The CodeBuild project for the backend uses the
Stage 3: Deploy Infrastructure
- Purpose: Deploy the application infrastructure using CloudFormation.
- How It Works:
- The pipeline uses the
cloudformation-application.ymltemplate to create or update the application infrastructure. - Key parameters passed to the template include:
- The URI of the Docker image in ECR.
- Whether the app uses a serverless or serverful architecture.
- The Project Name
- This stage creates resources like S3 buckets, CloudFront distributions, Cognito user pools, DynamoDB tables, Lambda functions, API Gateway, and more (depending on the
IsServerlessflag).
- The pipeline uses the
Stage 4: Frontend Build
- Purpose: Build the React frontend and deploy it to the frontend S3 bucket.
- How It Works:
- The CodeBuild project for the frontend uses the
buildspec-frontend.ymlfile to:- Build the React app using Vite.
- Upload the built files (from the
dist/folder) to the frontend S3 bucket.
- The frontend is configured with environment variables passed from previous stages, such as:
API_ENDPOINT: The API Gateway endpoint for the backend.USER_POOL_ID: The Cognito User Pool ID for authentication.CLIENT_ID: The Cognito Client ID for the app.S3_BUCKET_NAME: The name of the frontend S3 bucket.
- Once uploaded, the frontend is served via CloudFront for fast and reliable access.
- The CodeBuild project for the frontend uses the
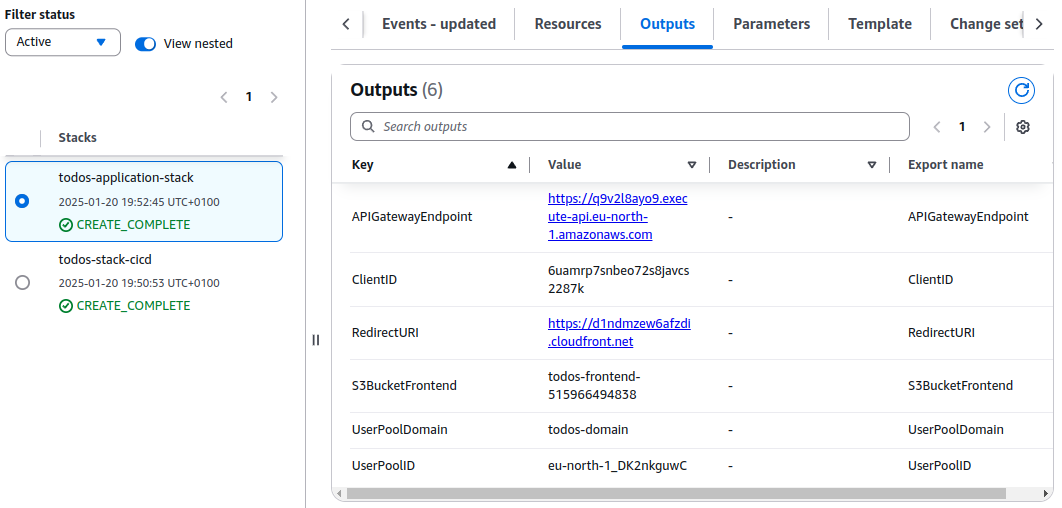
Outcome
When the pipeline successfully finishes, an additional CloudFormation stack will be created for the application infrastructure. To access the application URL:
- Go to the AWS CloudFormation Console.
- Select the newly created stack (its name will include the
ProjectNameyou specified, e.g.,todos-application-stack). - Navigate to the Outputs tab.
- Look for the
RedirectURIvariable. This is the URL of our deployed TODO app, served via CloudFront.
5. Serverless vs Serverful
In this project, the TODO app can be deployed using two different architectures: serverless and serverful. Both approaches have their own advantages and trade-offs, and the choice between them depends on factors like cost, scalability, and complexity. Below, I’ll explain what these terms mean in the context of this project and how each architecture is implemented.
What Do Serverless and Serverful Mean?
- Serverless: In a serverless architecture, you don’t manage servers directly. Instead, you rely on managed services like AWS Lambda to run your code. The infrastructure is fully managed by AWS, and you only pay for the compute time you use. This approach is ideal for applications with variable or unpredictable traffic.
- Serverful: In a serverful architecture, you manage the servers yourself (e.g., using EC2 instances). You’re responsible for provisioning, scaling, and maintaining the infrastructure. This approach gives you more control but requires more effort to manage.
Serverless Architecture
In the serverless backend, the app uses the following AWS services:
- API Gateway: Acts as the entry point for the backend API.
- Lambda: Runs the backend logic (FastAPI app) in a serverless environment.
- DynamoDB: Stores the TODO tasks.
- Cognito: Handles user authentication.
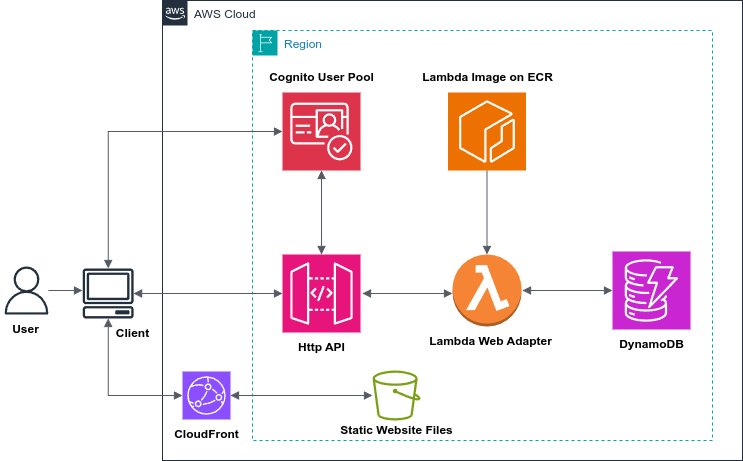
How It Works
- API Gateway:
- I used HTTP API instead of REST API because it’s cheaper and provides all the features needed for this project.
- The API Gateway is integrated with Cognito User Pool to protect the API. Only authenticated users can access the endpoints.
- Lambda:
- The FastAPI backend is packaged as a Docker image and deployed to Lambda using the AWS Lambda Web Adapter.
- Lambda automatically scales based on incoming requests, so you don’t need to worry about managing servers.
- DynamoDB:
- The Lambda function interacts with DynamoDB to perform CRUD operations on tasks.
- Cognito:
- Handles user authentication and provides tokens that are validated by API Gateway.
Serverful Architecture
In the serverful backend, the app uses the following AWS services:
- API Gateway: Acts as the entry point for the backend API.
- VPC Link: Connects API Gateway to the internal Application Load Balancer (ALB).
- Application Load Balancer (ALB): Distributes traffic to EC2 instances.
- Auto Scaling Group: Automatically scales the number of EC2 instances based on demand.
- EC2 Instances: Run the FastAPI backend in Docker containers.
- DynamoDB: Stores the TODO tasks.
- Cognito: Handles user authentication.
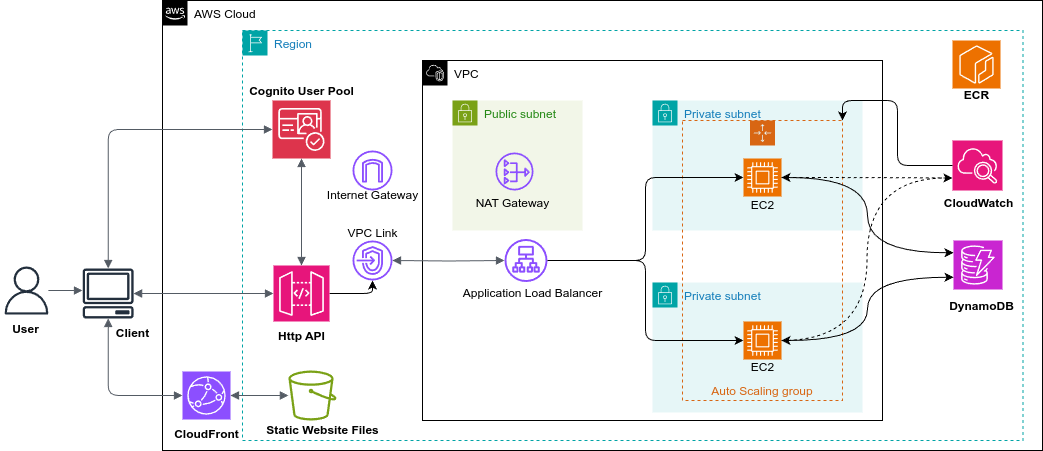
How It Works
- API Gateway:
- Similar to the serverless architecture, I used HTTP API for cost efficiency.
- The API Gateway is integrated with Cognito User Pool for authentication.
- VPC Link:
- Since the Application Load Balancer is internal (within a VPC), a VPC Link is used to connect API Gateway to the ALB.
- Application Load Balancer (ALB):
- Distributes incoming traffic across multiple EC2 instances in the Auto Scaling Group.
- Auto Scaling Group:
- Uses a Launch Template to provision EC2 instances.
- The UserData script in the Launch Template:
- Installs Docker on the EC2 instances.
- Pulls the Docker image from ECR.
- Runs the FastAPI backend on port 80.
- EC2 Instances:
- The EC2 instances run in private subnets for security.
- A NAT Gateway in a public subnet allows the EC2 instances to access the internet (to install packages etc.).
- An Internet Gateway is attached to the VPC to enable internet access for the NAT Gateway.
- DynamoDB:
- The FastAPI backend interacts with DynamoDB to manage tasks.
- Cognito:
- Handles user authentication, similar to the serverless architecture.
Switching Between Architectures
One of the key benefits of this project is the ability to seamlessly switch between serverless and serverful architectures by simply changing the IsServerless parameter in the CloudFormation template. This flexibility allows you to experiment with both approaches and choose the one that best fits your needs.
6. Conclusion
Building this TODO app with AWS has been an incredibly rewarding experience. Not only did it help me gain hands-on experience with a wide range of AWS services, but it also gave me a deeper understanding of CI/CD pipelines, infrastructure-as-code, and the trade-offs between serverless and serverful architectures. By leveraging tools like AWS CodePipeline, CloudFormation, Lambda, EC2, and Cognito, I was able to create a scalable, secure, and fully automated application deployment process.
I hope this blog post has provided valuable insights into building cloud-based applications with AWS. If you’re interested in exploring the code or trying it out yourself, check out the project on GitHub: https://github.com/adavoudi/todo-app-aws.