Autoscaling Group with Target Tracking Policy Using AWS CloudFormation
In this blog post, we will explore how to create an autoscaling group with a target tracking policy using AWS CloudFormation. We’ll delve into the concepts of autoscaling groups, different scaling policies, and why AWS recommends using target tracking policies. Additionally, we will walk through an example that demonstrates the behavior of an autoscaling group in response to CPU utilization changes.

1. Understanding Auto Scaling Groups
An Auto Scaling group is a collection of Amazon EC2 instances that share similar characteristics and are treated as a logical grouping for scaling and management purposes. The primary purpose of an Auto Scaling group is to ensure that there are enough EC2 instances available to handle the load on your application.
Key components of an Auto Scaling group include:
- Minimum size: The smallest number of instances that should be running.
- Maximum size: The largest number of instances that can be running.
- Desired capacity: The ideal number of instances that should be running at any given time.
When demand increases, Auto Scaling launches additional instances. Conversely, when demand decreases, it terminates instances, ensuring that you only pay for the compute resources you need.
2. Exploring Different Scaling Policies
There are three main types of scaling policies:
- Simple scaling: Adjusts the desired capacity by a fixed amount when a CloudWatch alarm is triggered.
- Step scaling: Adjusts the desired capacity based on the size of the alarm breach.
- Target tracking scaling: Automatically adjusts the desired capacity to keep a specific metric at a particular value.
3. Why AWS Recommend Target Tracking Policies
AWS strongly recommends using target tracking scaling policies because they simplify maintaining optimal performance while minimizing costs. With target tracking, you set a target value for a specific metric (e.g., average CPU utilization or average request count per target), and Amazon EC2 Auto Scaling automatically adjusts the capacity of your group to maintain that target.
Here’s why target tracking is advantageous:
- Proportional scaling: If you double the size of your Auto Scaling group, the metric decreases by 50 percent, allowing the metric data to accurately trigger proportional scaling events.
- Adaptive to load changes: Target tracking policies adapt to both immediate and gradual load changes, such as seasonal variations.
- Automation: You don’t need to manually define CloudWatch alarms and scaling adjustments; Amazon EC2 Auto Scaling handles these automatically based on the target you set.
4. The CloudFormation Template
To implement the above setup, I used an AWS CloudFormation template:
Parameters:
  EC2InstanceType:
    Type: String
    Default: t2.micro
    Description: EC2 instance type
  KeyName:
    Type: String
    Description: Name of an existing EC2 KeyPair to enable SSH access to the instance
    Default: MyMainKey
  ImageId:
    Type: AWS::SSM::Parameter::Value<AWS::EC2::Image::Id>
    Description: Image ID
    Default: /aws/service/ami-amazon-linux-latest/amzn2-ami-hvm-x86_64-gp2
  TargetCPUUtilization:
    Type: Number
    Default: 50
    Description: Target CPU Utilization

Resources:
  # Security Resources
  MyEC2SecurityGroup:
    Type: AWS::EC2::SecurityGroup
    Properties:
      GroupDescription: Enable HTTP and SSH access
      VpcId: !Ref VPC
      SecurityGroupIngress:
        - IpProtocol: tcp
          FromPort: '80'
          ToPort: '80'
          CidrIp: '0.0.0.0/0'
        - IpProtocol: tcp
          FromPort: '22'
          ToPort: '22'
          CidrIp: '0.0.0.0/0'

  # Compute Resources

  EC2LaunchTemplate:
    Type: AWS::EC2::LaunchTemplate
    Properties:
      LaunchTemplateName: !Sub "${AWS::StackName}-LaunchTemplate"
      LaunchTemplateData:
        ImageId: !Ref ImageId
        InstanceType: !Ref EC2InstanceType
        KeyName: !Ref KeyName
        SecurityGroupIds:
          - !GetAtt MyEC2SecurityGroup.GroupId
        IamInstanceProfile:
          Name: !Ref EC2InstanceProfile
        # Enable detailed monitoring
        Monitoring:
          Enabled: true
        TagSpecifications:
          - ResourceType: instance
            Tags:
              - Key: Name
                Value: "AutoScaling-Test-Instance"
        UserData:
          Fn::Base64: |
            #!/bin/bash -xe
            yum update -y
            yum install -y httpd
            systemctl start httpd
            systemctl enable httpd
            echo "<html><body><h1>Hello World</h1></body></html>" > /var/www/html/index.html

            amazon-linux-extras install epel -y
            yum install stress -y
            yum install cpulimit -y

            cat <<EOF > /bin/stress-cpu.py
            import subprocess
            import sys
            import time

            def limit_cpu(percent, seconds):
                try:
                    stress_process = subprocess.Popen(["stress", "--cpu", "1", "--quiet", "--timeout", str(seconds)])
                    subprocess.Popen(["cpulimit", "-p", str(stress_process.pid), "-l", str(percent), "-i"])
                    print(f"Stress PID {stress_process.pid}, CPU limited to {percent}% for {seconds} seconds.")
                    stress_process.wait()
                except KeyboardInterrupt:
                    stress_process.terminate()
                    stress_process.wait()
                    print("Processes stopped.")

            if __name__ == "__main__":
                if len(sys.argv) != 3:
                    print("Usage: python limit_cpu.py <cpu_percent> <seconds>")
                    sys.exit(1)
                try:
                    percent = int(sys.argv[1])
                    seconds = int(sys.argv[2])
                    if percent < 1 or percent > 100:
                        raise ValueError("CPU percent must be between 1 and 100.")
                except ValueError:
                    print("Error: CPU percent must be an integer between 1 and 100, and seconds must be a positive integer.")
                    sys.exit(1)
                limit_cpu(percent, seconds)
            EOF


  AutoScalingGroup:
    Type: AWS::AutoScaling::AutoScalingGroup
    DependsOn:
         - AttachRouteTable
    Properties:
      LaunchTemplate:
        LaunchTemplateId: !Ref EC2LaunchTemplate
        Version: !GetAtt EC2LaunchTemplate.LatestVersionNumber
      MinSize: 1
      MaxSize: 3
      DesiredCapacity: 1
      VPCZoneIdentifier:
        - !Ref PublicSubnet
      Tags:
        - Key: Name
          Value: !Sub "${AWS::StackName}-Instance"
          PropagateAtLaunch: true

  CPUTargetTrackingScalingPolicy:
    Type: AWS::AutoScaling::ScalingPolicy
    Properties:
      PolicyName: CPUTargetTrackingScalingPolicy
      PolicyType: TargetTrackingScaling
      AutoScalingGroupName: !Ref AutoScalingGroup
      TargetTrackingConfiguration:
        TargetValue: !Ref TargetCPUUtilization
        PredefinedMetricSpecification:
          PredefinedMetricType: ASGAverageCPUUtilization

  EC2InstanceProfile:
    Type: AWS::IAM::InstanceProfile
    Properties:
      Roles:
        - !Ref EC2Role

  EC2Role:
    Type: AWS::IAM::Role
    Properties:
      AssumeRolePolicyDocument:
        Version: '2012-10-17'
        Statement:
          - Effect: Allow
            Principal:
              Service: ec2.amazonaws.com
            Action: sts:AssumeRole
      ManagedPolicyArns:
        - arn:aws:iam::aws:policy/AmazonSSMManagedInstanceCore


  # Networking Resources
  VPC:
    Type: AWS::EC2::VPC
    Properties:
      CidrBlock: 10.10.0.0/16
      EnableDnsSupport: true
      EnableDnsHostnames: true
      Tags:
        - Key: Name
          Value: !Sub "${AWS::StackName}-VPC"

  InternetGateway:
    Type: AWS::EC2::InternetGateway
    Properties:
      Tags:
        - Key: Name
          Value: !Sub "${AWS::StackName}-IGW"

  AttachGateway:
    Type: AWS::EC2::VPCGatewayAttachment
    Properties:
      VpcId: !Ref VPC
      InternetGatewayId: !Ref InternetGateway

  PublicSubnet:
    Type: AWS::EC2::Subnet
    Properties:
      VpcId: !Ref VPC
      CidrBlock: 10.10.0.0/24
      AvailabilityZone: !Select [ 0, !GetAZs "" ]
      MapPublicIpOnLaunch: true
      Tags:
        - Key: Name
          Value: !Sub "${AWS::StackName}-PublicSubnet"

  RouteTable:
    Type: AWS::EC2::RouteTable
    Properties:
      VpcId: !Ref VPC
      Tags:
        - Key: Name
          Value: !Sub "${AWS::StackName}-RT"

  Route:
    Type: AWS::EC2::Route
    DependsOn: AttachGateway
    Properties:
      RouteTableId: !Ref RouteTable
      DestinationCidrBlock: 0.0.0.0/0
      GatewayId: !Ref InternetGateway

  AttachRouteTable:
    Type: AWS::EC2::SubnetRouteTableAssociation
    Properties:
      SubnetId: !Ref PublicSubnet
      RouteTableId: !Ref RouteTable
This template includes:
- Networking components (VPC, Subnet, Internet Gateway, Route Table, Security Group).
- Launch Template specifying the configuration for launching EC2 instances.
- Auto Scaling Group defining the group with a minimum size of 1, maximum size of 3, and desired capacity of 1.
- Target Tracking Scaling Policy configured to maintain an average CPU utilization of 50%.
- Detailed monitoring for EC2 instances is enabled: By default, all Amazon EC2 metrics are published in five-minute intervals, but they are configurable to a lower interval of one minute by enabling detailed monitoring. This higher resolution allows for more responsive scaling actions and better visibility into the performance of your instances.
5. Simulating CPU Load with AWS Systems Manager
To test the effectiveness of the target tracking policy, I simulated CPU load on the initial instance using the stress-cpu.py script. This was achieved using the AWS Systems Manager send-command:
aws ssm send-command --targets "Key=tag:Name,Values=MAIN-Instance" --document-name "AWS-RunShellScript" --parameters '{"commands": ["python3 /bin/stress-cpu.py 70 300"]}'
The aws ssm send-command is a feature of AWS Systems Manager that allows you to remotely run commands on managed instances. Here’s how it works:
- Targets: Specify which instances should execute the command using tags, instance IDs, or other criteria.
- Document Name: Choose the document that defines the operation to perform (e.g.,
AWS-RunShellScriptfor running shell scripts). - Parameters: Pass any necessary parameters to the command.
In my example, the send-command runs the stress-cpu.py script on the instance tagged with MAIN-Instance, simulating high CPU usage.
For more details about the stress-cpu.py script and how it works, check out my previous post: Simulate CPU Utilization with stress and cpulimit.
6. Analyzing the Activity History
Below is the activity history of the Auto Scaling group, illustrating its response to the simulated CPU load:
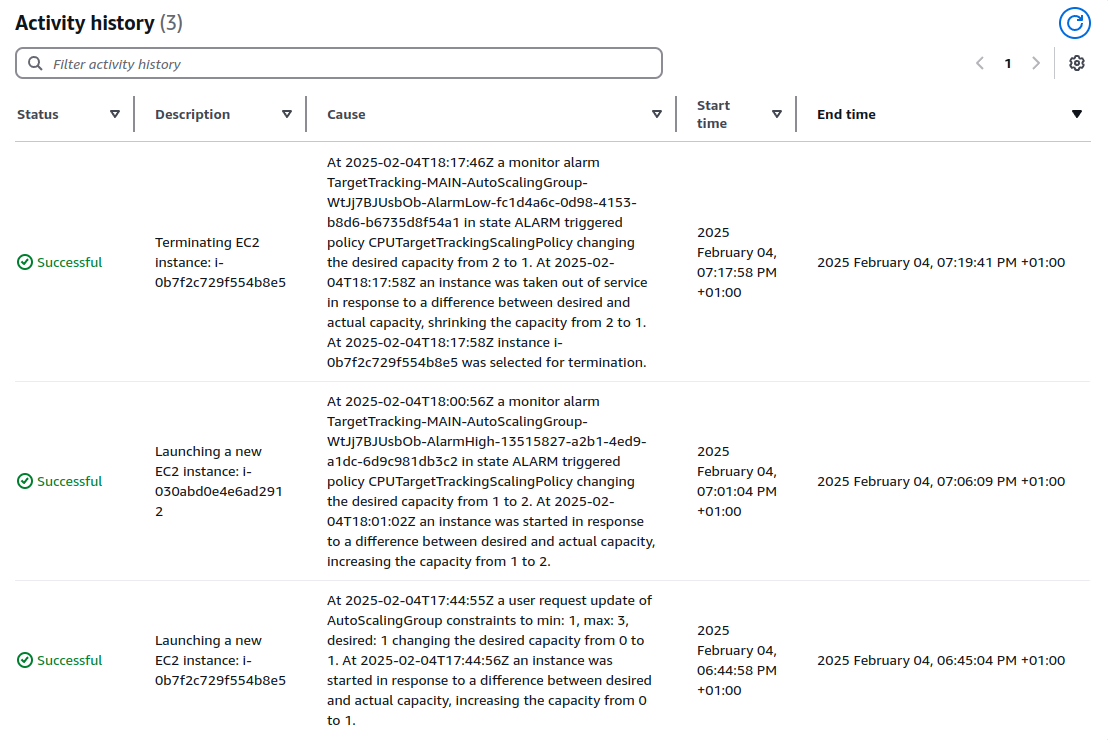
- Initial Instance Launch: An instance was launched to meet the initial desired capacity of 1.
- Scaling Out: When the CPU utilization exceeded the target value of 50%, the target tracking policy triggered a scale-out event, increasing the desired capacity from 1 to 2. This happend around five minitues after I ran the python cpu utilization command.
- Scaling In: Once the CPU utilization dropped below the target value, the policy triggered a scale-in event, reducing the desired capacity back to 1. This happend around 15 minites after the python script finished and the cpu utilization dropped below 10 percent.
Conclusion
By leveraging AWS CloudFormation and target tracking scaling policies, you can efficiently manage the capacity of your Auto Scaling groups, ensuring optimal performance and cost-effectiveness. This step-by-step guide demonstrates how easy it is to automate scaling decisions based on real-time metrics, making it simpler to handle varying workloads without manual intervention. Enabling detailed monitoring and utilizing AWS Systems Manager commands further enhance the management and responsiveness of your infrastructure.